Simulation vs. Emulation
In Part 1, we learned how to simulate an LCD display entirely in Java using a custom TrueType font rendered in JavaFX. The hardware section demonstrated, how to use a Java based terminal application to interact with the hardware LCD. Next we will tweak our JavaFX application to use the same serial interface implementation, which allows swapping them without disrupting or changing any other software component of our DIY-pedal board.
And simulating Arduino is a bit misleading: we are simulating the behaviour of the Arduino –> I2C –> LCD by swapping a real hardware serial connection by software simulated connection, but using the same protocol. Thus from a callers perspective it does not play a role if the CMD changes text on real hardware or a simulated LCD.s
Simulating a serial endpoint
The Java Software part
Now that our Arduino can talk to an LCD over I²C, it’s time to bring that same communication into our Java simulation environment. Why? Because sometimes you want to keep building your software without waiting for the soldering iron to heat up. We don’t reinvent the wheel here. The excellent jSerialCom library takes care of all the low-level serial handling. You can grab it directly from Maven Central.
We wrap the serial logic in its own Java Thread the constructor stays quiet for now, no connections yet.
public class SerialCommandAdapter
    extends Thread
{
    public interface ICommandHandler
    {
        String process(final String command);
    }

    private final String _portName;
    private final ICommandHandler _commandHandler;

    private SerialPort _serialPort = null;

    /**
     *
     * @param portName like /dev/cu.usbserial-1234
     */
    public SerialCommandAdapter(final String portName, final ICommandHandler commandHandler)
    {
        _portName = portName;
        _commandHandler = commandHandler;
    }
}
Instead, we wait until the user explicitly calls “connect”, by starting the Thread.
@Override
public void start()
{
    _serialPort = SerialPort.getCommPort(_portName);
    _serialPort.setBaudRate(115200);
    _serialPort.setNumDataBits(8);
    _serialPort.setParity(SerialPort.NO_PARITY);
    _serialPort.setNumStopBits(SerialPort.ONE_STOP_BIT);
    _serialPort.setComPortTimeouts(SerialPort.TIMEOUT_READ_SEMI_BLOCKING, 5000, 5000);

    if (!_serialPort.openPort()) {
        throw new IllegalStateException("Failed to open " + _portName);
    }

    super.start();
}
Once started, the thread drops into its run() method and begins listening.
@Override
@SneakyThrows
public void run()
{
    try (final InputStream in = _serialPort.getInputStream();
         final OutputStream out = _serialPort.getOutputStream()
    ) {
        // Write a test line
        out.write("SerialCommandAdapter ready\n".getBytes());
        out.flush();

        // Read loop (basic example)
        final StringBuffer buffer = new StringBuffer();
        final byte[] byteBuffer = new byte[256];
        int bytesRead = 0;
        while (_serialPort.isOpen()) {
            try {
                while (0 <= (bytesRead = in.read(byteBuffer))) {
                    final String textReceived = new String(byteBuffer, 0, bytesRead, StandardCharsets.UTF_8);
                    int cmdSplitIdx = 0, lastSplitIdx = 0;
                    while (0 <= (cmdSplitIdx = textReceived.indexOf("\r", lastSplitIdx))) {
                        buffer.append(textReceived.substring(0, cmdSplitIdx));
                        _commandHandler.process(buffer.toString());
                        buffer.setLength(0);
                        lastSplitIdx = cmdSplitIdx + 1;
                    }

                    buffer.append(textReceived.substring(lastSplitIdx));
                }
            } catch (final SerialPortTimeoutException e) {
                // just ignore and check graceful shutdown
            }
        }
    } finally {
        _serialPort.closePort();
    }
}
The read loop continuously pulls data from the serial port into a buffer, then splits commands at \r (carriage return).
Each complete command is sent to an ICommandHandler.process(cmd) method.
This is where Inversion of Control (IoC) comes in. By defining a simple interface, we can inject any handler we want,
whether it’s a mock display, a logger, or a full JavaFX LCD simulation. The serial adapter doesn’t care,
as long as it matches the interface. This allows decoupling and reuse of components and services.
The parsing logic is identical to our C++ Arduino version, so we’re speaking the same “language”, but different
programming languages, though. Instead of pushing data to a real LCD over I²C,
we call a controller that updates our JavaFX LCD display.
This separation means our SerialCommandAdapter
doesn’t know (or care) about the LCD internals, a classic Adapter/Proxy pattern.
For quick tests, I added a main() method. Pass the port name as an argument,
and you can instantly simulate serial traffic without touching real hardware.
public static void main(final String[] args)
{
    final ICommandHandler commandHandler = command -> {
        System.out.println(command);
        return null;
    };

    new SerialCommandAdapter(args[0], commandHandler).start();
}
This approach keeps your simulation environment and physical hardware in sync. Write once, test anywhere — whether that’s on an Arduino Nano or a JavaFX window.
The MacOSX part
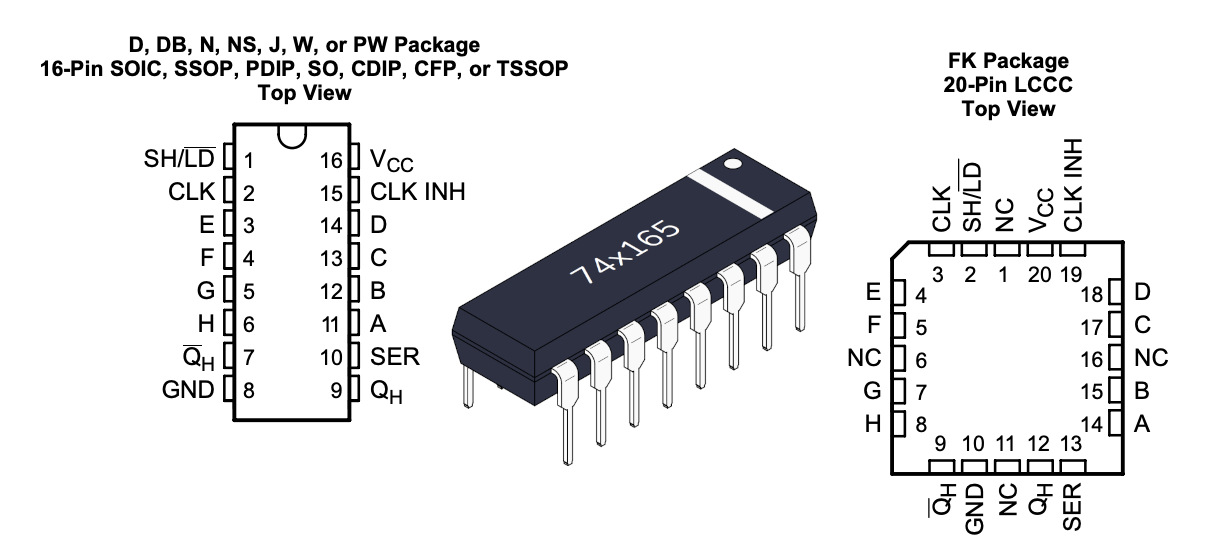
Back in the 80s, “serial” wasn’t a breakfast choice it was how computers, modems, and printers actually talked to each other. If you wanted your microcontroller to have a conversation with the outside world, you needed two trusty sidekicks: the 74HC165 and the MAX232. You could connect 8 TTL data lines to the 74HC165 and it magically clocks them out one by one via the QH serial output, so it sends bits over one cable from one computer to another, while the MAX232 does the voltage lift from 5V to 12V. This is known as RS-232 (Recommended Standard 232), introduced in the 1960s, and still in use 2025, virtualized.
Due to the fact we have no hardware IC’s, we need to create a virtual serial bridge so we can connect our SerialTerminalApp and SerialCommandAdapter to control our JavaFX LCDs.
Therefore we need socat…
brew install socat
…and a some Bash to start and stop the virtual serial bride.
./vserial-start.sh

2025/08/10 23:07:26 socat[27722] N PTY is /dev/ttys014
2025/08/10 23:07:26 socat[27722] N PTY is /dev/ttys017
2025/08/10 23:07:26 socat[27722] N starting data transfer loop with FDs [5,5] and [7,7]
Virtual serial pair is up:
/tmp/vserial0A  ->  /dev/ttys014
/tmp/vserial0B ->  /dev/ttys017
socat PID: 27722 (stored in /tmp/vserial0.pid)
And, finally test it!
After successfully setting up socat two virtual serial endpoints /tmp/vserial0A and /tmp/vserial0B are created.
We can then connect our sender SerialTerminalApp via /tmp/vserial0A to our receiver SerialCommandAdapter via /tmp/vserial0B
That’s it!