Simulation vs. Emulation – What’s the Difference?
Although the terms simulation and emulation are sometimes used interchangeably, they serve different purposes in software and hardware development — and understanding the distinction is key when choosing the right approach.
Simulation (Modeling Behavior)
Simulation is about mimicking the behavior of a system or component in a simplified, abstract way. It doesn’t try to perfectly replicate the underlying internals — instead, it models just enough to let you observe, analyze, or test how something would behave under certain conditions.
- Simulating sensor data to test how an application reacts to temperature changes
- Simulating network latency to see how a service handles delays
- Simulating user interactions in a UI prototype to gather feedback
- Simulations are usually faster and more lightweight, making them ideal for early design stages, performance analysis, or algorithm testing — especially when exact hardware or real-world conditions aren’t available yet.
Reproducing Reality
Emulation, on the other hand, is about reproducing the real behavior of a system or component as closely as possible. The goal is to make other software or systems believe they’re interacting with the real thing — often at a low, detailed level.
- Running mobile apps on a desktop emulator that mimics an Android device
- Emulating a microcontroller so you can test firmware without physical hardware
- Emulating an old gaming console to play original games on modern machines
- Emulators aim for high fidelity, often down to the instruction set or timing behavior. This makes them essential when you need to test real code, legacy compatibility, or low-level integration, especially when access to actual hardware is limited or expensive.
Simulation of Hardware
Let’s pretend we don’t have a running prototype to control LCDs just yet. No hardware soldered, no wires tangled — just an idea. So how do we explore how data could be distributed across multiple displays during development? Easy: we simulate it. We treat each LCD as a component — without caring whether it’s software or hardware. If the interface is clean and well-designed, we can swap the implementation later without breaking anything. That’s the beauty of abstraction. And just to embrace polyglot programming, we’ll skip Dart and C++ this time and do it in Java. Because why not?
Idea
The main idea is simple: We use a TrueType Font which shows text like a dot matrix, show 4 rows of 20 character, done. And to prevent you get bored, let me show you the final result, before we get into nasty details

Curious? Great! Instead of repeating everything here, check out the Tools and Visuals section for details on how we handle TrueType fonts and why they play a surprisingly important role.
First, let’s put our AI companion to work, burning a bit of fossil energy to spin up a JavaFX-based skeleton. I’ve polished the entire conversation into a PDF, but honestly, it only took four well-placed questions to get the initial “single display” simulator app up and running, with maven.
From Arduino C++ to JavaFX
Remember how we used a C++ lib to access the LCD from our Microcontroller?
The functions we used
where setCursor(0, 0) or print("Hello, World!!").
JavaFX classes
A JavaFX independent Java interface could be:
package de.diy_pedalboard.controls;

public interface ILcdDisplay
{
    void clear();
    void setCursor(final int col, final int row);
    void print(final String text);
}
and the implementation like this:
package de.diy_pedalboard.controls;

@Accessors(prefix = "_")
public class JavaFXLCDDisplay
    extends VBox
    implements ILcdDisplay
{
    ...
    public JavaFXLCDDisplay(final int fontHeight)
    {
        super(VBOX_SPACING);

        final Font customFont = Font.loadFont(
            getClass().getResourceAsStream("/LCD5x7SegmentMonospace-Regular.otf"), fontHeight
        );

        final Text oneChar = new Text("A");
        oneChar.setFont(customFont);

        _screenWidth = oneChar.getLayoutBounds().getWidth() * 20 + 2 * PADDING;
        setMinWidth(_screenWidth);
        setMaxWidth(_screenWidth);
        _screenHeight = oneChar.getLayoutBounds().getHeight() * 4 + 2 * PADDING + 3 * VBOX_SPACING;
        setMinHeight(_screenHeight);
        setMaxHeight(_screenHeight);
        setStyle("-fx-background-color: blue; -fx-padding: " + PADDING + "px; -fx-border-radius: 0px; -fx-background-radius: 0px;");

        for (int i = 0; i < ROWS; i++) {
            final Text text = new Text(" ".repeat(COLS));
            text.setFont(customFont);

            _textRows[i] = text;
            _textRows[i].setFill(Color.WHITE);

            getChildren().add(_textRows[i]);
            _rowData[i] = new StringBuilder(" ".repeat(COLS));
        }
    }

    @Override
    public void clear()
    {
        for (int i = 0; i < ROWS; i++) {
            _rowData[i] = new StringBuilder(" ".repeat(COLS));
            _textRows[i].setText(_rowData[i].toString());
        }
        _cursorRow = 0;
        _cursorCol = 0;
    }

    @Override
    public void setCursor(int col, int row)
    {
        if (row >= 0 && row < ROWS && col >= 0 && col < COLS) {
            _cursorRow = row;
            _cursorCol = col;
        }
    }

    @Override
    public void print(final String text)
    {
        int r = _cursorRow;
        int c = _cursorCol;

        for (char ch : text.toCharArray()) {
            if (r >= ROWS) break;

            if (c < COLS) {
                _rowData[r].setCharAt(c, ch);
                c++;
            } else {
                r++;
                if (r >= ROWS) break;
                c = 0;
                _rowData[r].setCharAt(c, ch);
                c++;
            }
        }

        for (int i = 0; i < ROWS; i++) {
            _textRows[i].setText(_rowData[i].toString());
        }

        _cursorRow = r;
        _cursorCol = c;
      }
}
In a typical JavaFX application, the main() method launches the JavaFX runtime, which calls the start(Stage primaryStage)
method. Within start(), the program creates an LcdDisplay (or any other node), adds it to a Scene,
and sets that scene on the Stage. The Scene represents the JavaFX UI hierarchy,
while the Stage acts as the top-level window provided by the operating system.
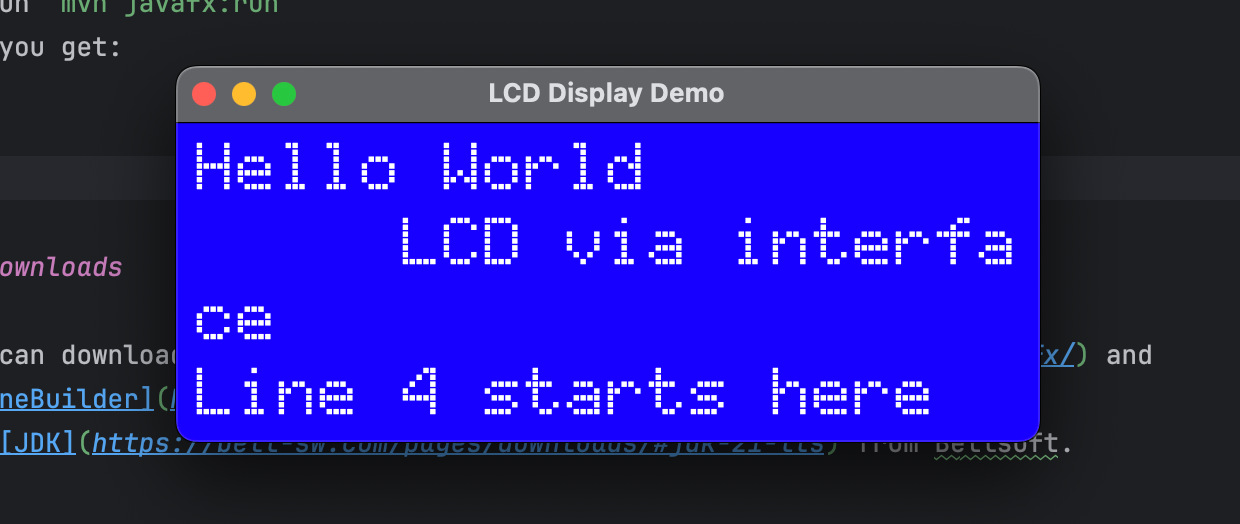
public class MainSingle
    extends Application
{
    @Override
    public void start(final Stage primaryStage)
    {
        final JavaFXLCDDisplay display = new JavaFXLCDDisplay();

        display.setCursor(0, 0);
        display.print("Hello World");

        display.setCursor(5, 1);
        display.print("LCD via interface");

        display.setCursor(0, 3);
        display.print("Line 4 starts here");

        final Scene scene = new Scene(display, display.getScreenWidth(), display.getScreenHeight());
        primaryStage.setTitle("LCD Display Demo");
        primaryStage.setScene(scene);
        primaryStage.show();
    }

    public static void main(final String[] args)
    {
        launch(args);
    }
}
Run via IntelliJ
Now we can run it by creating a Intellij run config and press start:
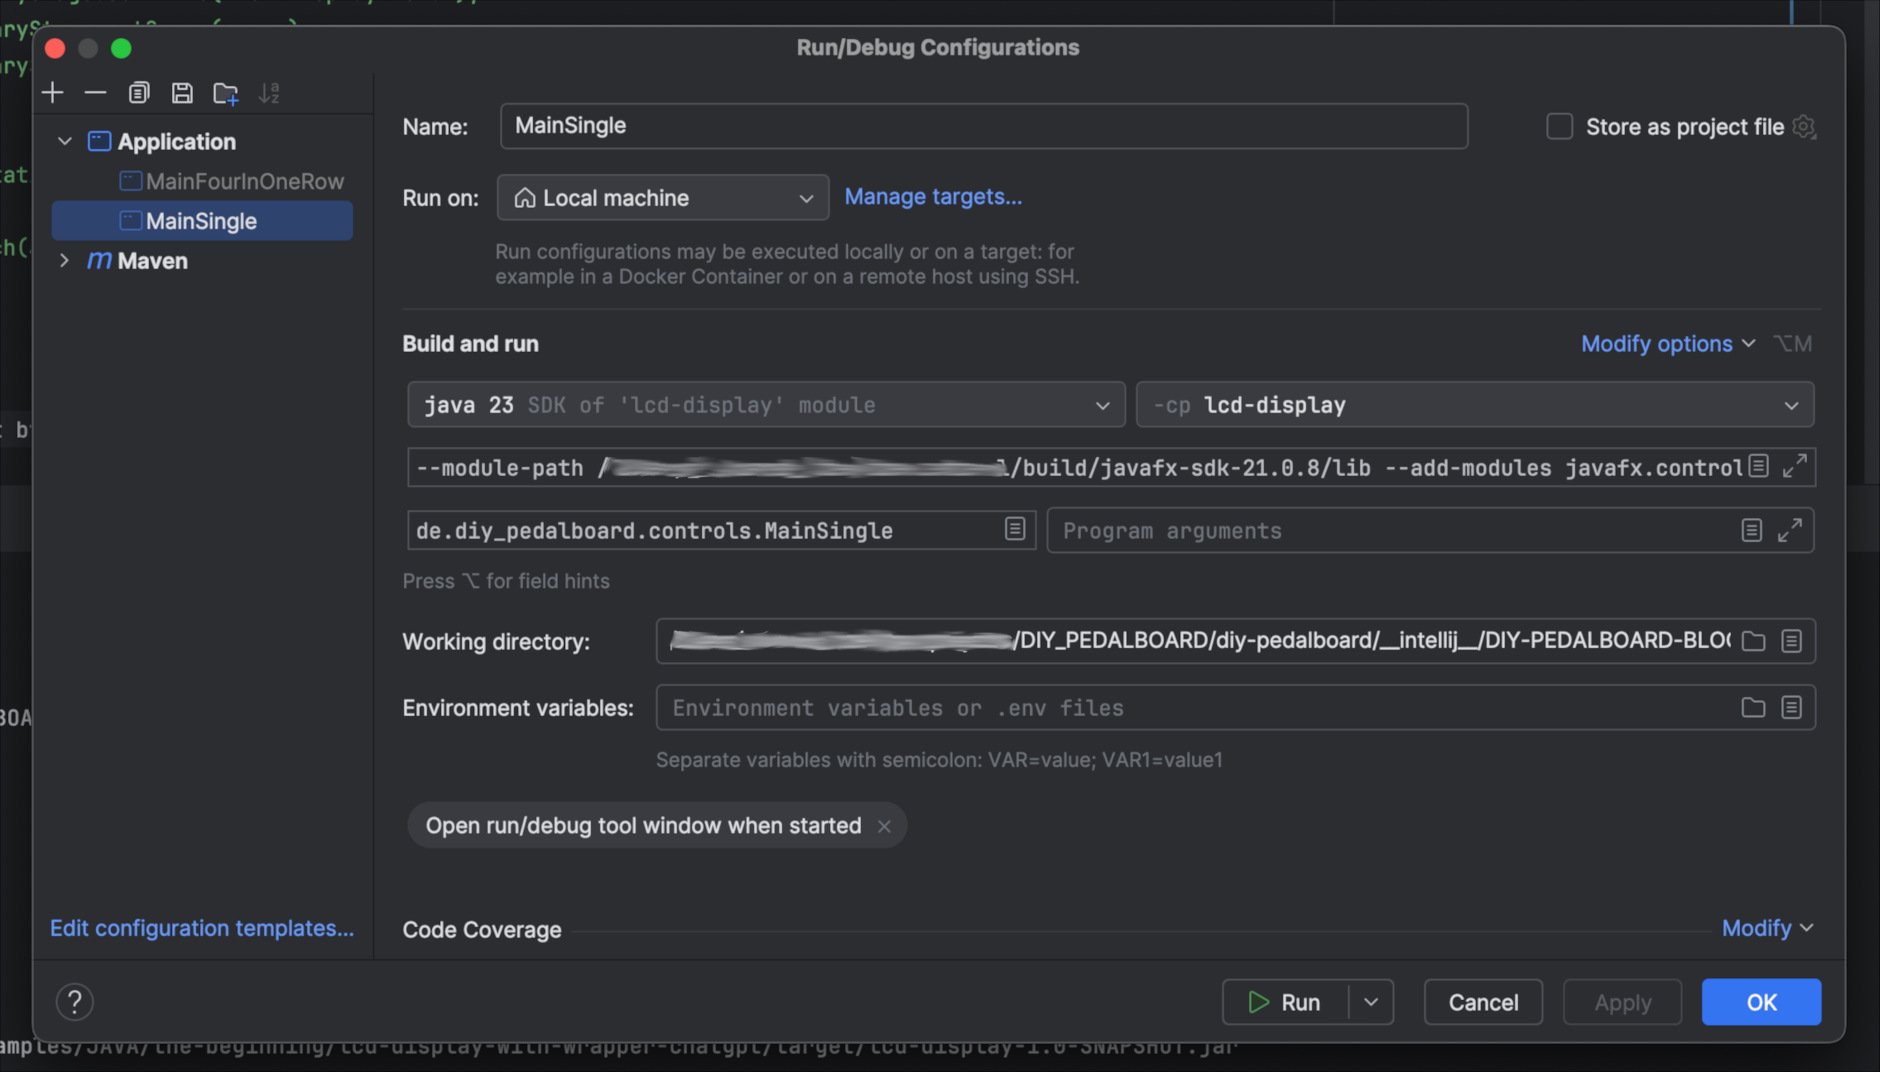
JavaFX requires some lengthy VM settings:
--module-path <YOUR_INSTALLATION_DIR>/javafx-sdk-21.0.8/lib
--add-modules javafx.controls,javafx.fxml
--enable-native-access=ALL-UNNAMED
Run by Maven
To compile type mvn clean install
To run mvn javafx:run
and you get:
Downloads
You can download javafx-sdk-xx.y.z and SceneBuilder from Gluon and JDK from Bellsoft.