ARDUINO
I started with an 8-bit processor in the mid-80s on an Apple IIe, marking my first deep dive into computing. Back then, I explored languages like Assembler and Pascal, slowly decoding the magic of opcodes, instructions, and CPU cycles.
Now, nearly 40 years later, the circle has closed. I’m once again working with an 8-bit processor — this time on an Arduino Nano — rediscovering Assembler, playing with instructions and cycles just like I did when it all began.
In today’s world, we all use technically brilliant touch devices from the age of two. But in that convenience, we often lose touch with the fundamentals — forgetting how these devices actually work under the hood. At their core, nothing has fundamentally changed: only the size, speed, and power consumption have evolved.
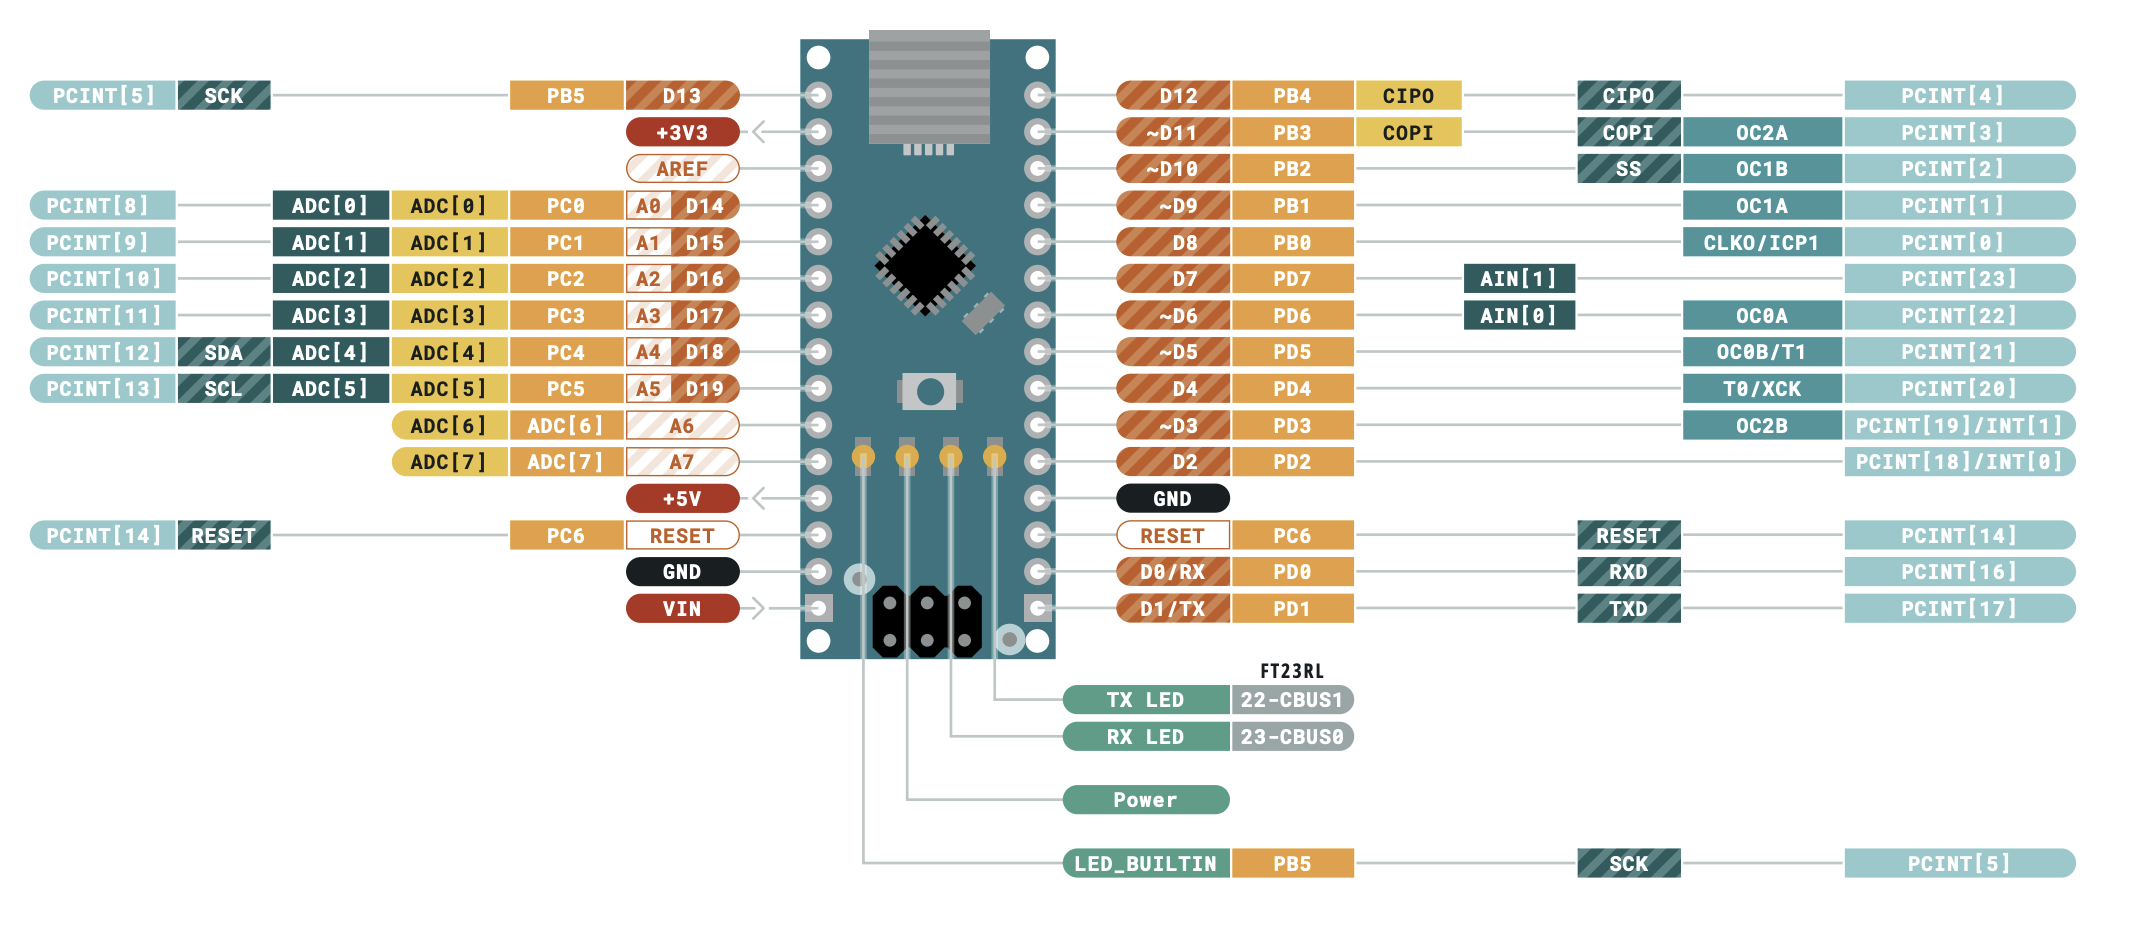
I chose the Arduino Nano for this section because it’s far easier to set up and experiment with compared to using Visual Studio Code and the ESP-IDF toolchain for the final device.
As mentioned before, the electronics and Arduino chapters are closely related and often overlap. Working on a microcontroller doesn’t mean we’re just hacking around or playing. In fact, applying solid software principles and good design practices is even more important here, precisely because we’re dealing with limited resources.
On a microcontroller, wasting cycles is strictly forbidden. That’s why careful software design, object-oriented development, and clear class hierarchies are critical to creating efficient, reusable components.
And last but not least — believe it or not — simply connecting an I²C LCD display to an Arduino can quickly open the door to a full-blown 1991-style debate about cooperative versus preemptive multitasking. And it is the starting point to discus interrupts, context switches, and the eternal attempt to simulate parallel work on a single-core processor.
Setup
Download the Arduino IDE from arduino.cc, install it, and you’re ready to go!
NOW WE ENTER THE DANGER ZONE
I AM NOT RESPONSIBLE IF YOU ACCIDENTALLY WIPE YOUR MACHINE
PROCEED AT YOUR OWN RISK!
When building software, a ton of artifacts get generated. To speed up development cycles, I usually move build and cache directories to a RAM disk — something we were already doing 40 years ago. Unbelievable, right?
THE FOLLOWING SECTION IS FOR MACOSX OR LINUX
Unfortunately, you can’t just configure the build path directly in the Arduino IDE. So, I asked my trusty sidekick ChatGPT:
Please, provide a shell script to create / delete a ram disk on MacOSX
See result on GitHub
Next, we need to trick the Arduino IDE into using the RAM disk as the build destination. We do this by forcing it through the TMP environment variable.
Can you force Arduino IDE to use the ram disk as build destination?
See result on GitHub
Instead of clicking the shiny Arduino IDE icon, we simply start it from a shell script. And honestly? We can live with that.
As a result, your builds no longer pollute your SSD with temporary files and endless cache junk.
Your SSD stays clean, your build times stay fast, and your inner perfectionist sleeps better at night.
But wait — there’s a small workaround needed.
While we can’t directly move the entire cache directory, we can use a symbolic link to point it to our RAM disk.
A simple trick — but incredibly effective.
First we remove existing artefacts by
rm -rf ~/Library/Caches/arduino
create ram disk and build dirs
./osx-ramdisk.sh create 512 myramdisk
mkdir -p /Volumes/myramdisk/arduino
and link it by the unix command
ln -s /Volumes/myramdisk/arduino-cache ~/Library/Caches/arduino
Now setup board type (Arduino Nano), bootloader (old), port (cu*), programmer (Arduino as ISP)
Open , compile and upload.
If you see a blinking on board LED we can enter the world of Instructions and Cycles!